- Installation
- Documents
VERIFY DAMPER OPERATION BEFORE INSTALLATION:
- Ensure that the installed damper sections conform to Tamco UL Classified Smoke Damper Installation Guidelines, which are included with shipment.
- Manually ensure that the damper sections operate freely and easily, before installing damper jumpers.
- If any assistance is required, call: Tamco CUSTOMER SERVICE 1-800-561-3449.
DAMPER JUMPER INSTALLATION PROCEDURE:
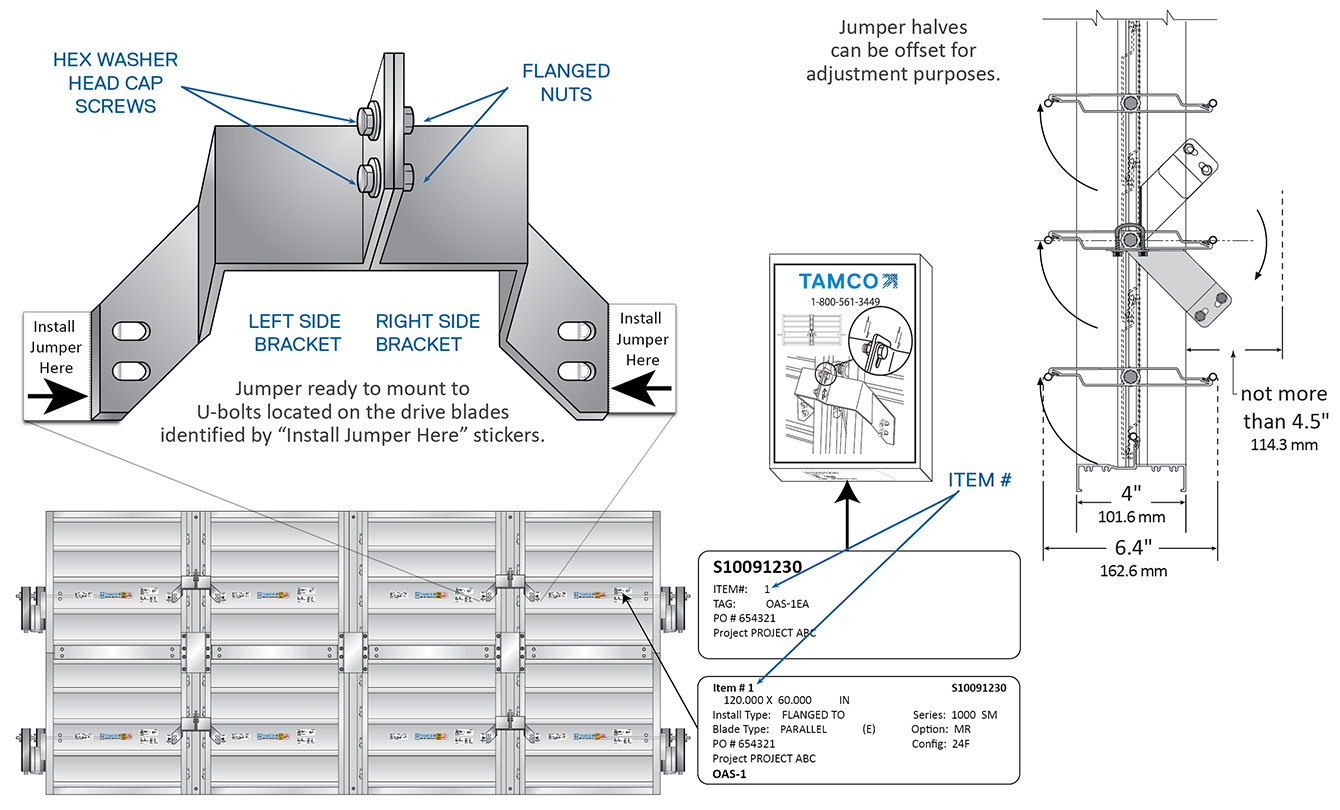
- Loosen and remove the hex nuts from the U-bolts located on the drive blades, where the two sections to be connected meet.
- (Take care that the U-bolts do not drop out if the damper is installed horizontally.)
- Install the damper jumper(s) as shown on the drawings on drive blades identified by “Install Jumper Here” stickers. Then, replace and tighten the hex nuts.
- Cycle the damper to ensure that both sections seal correctly. (Operate by driving the section which is to be directly connected to the motor.)
- If any adjustment is required, loosen both flanged nuts and head cap screws, and offset the halves of the jumper so as to allow the section with the actuator to close fully last.
- Re-tighten the flanged nuts and verify damper closure and repeat the adjustment procedure if necessary.
NOTE:
Damper jumpers are used to connect two damper sections operated from one actuator location. Do not use a jumper to connect more than two damper sections. If each damper section is to be operated with its own dedicated actuator, do not connect sections with a jumper, as the failure of one actuator may prevent the remaining actuator from operating both damper sections correctly, or may prevent operation entirely.
All actuators are factory-installed. Do not adjust or modify actuator installation.
Tamco UL/ULC Approved Smoke Damper Installation Guidelines
Download PDF Document
Download PDF Document (French)

