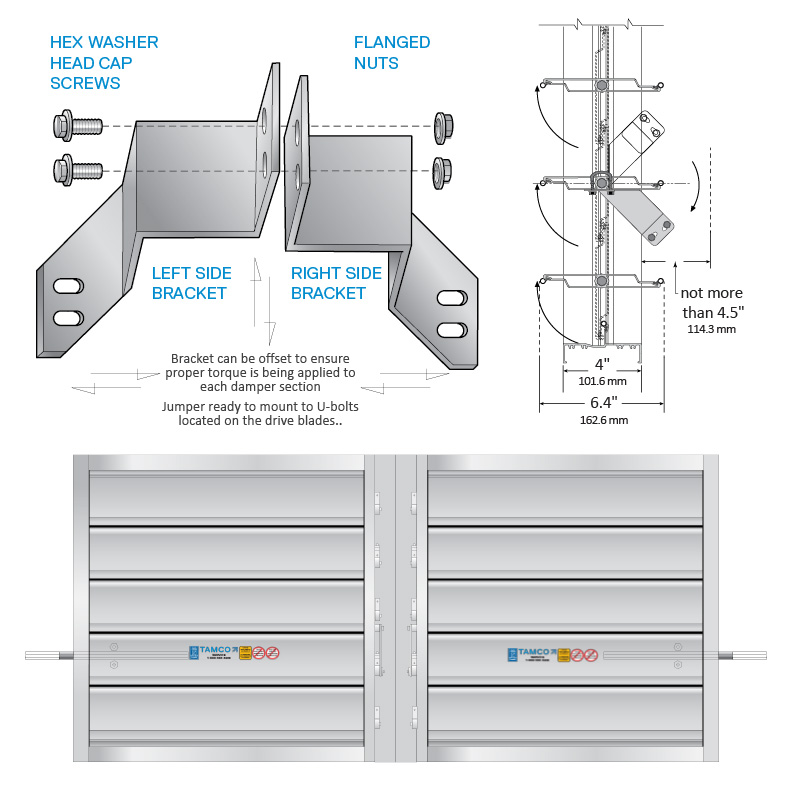
Installing Damper Jumpers
Control Dampers

- Installation
- Documents
VERIFY DAMPER OPERATION BEFORE INSTALLATION:
- Ensure that the installed damper sections conform to Tamco Aluminum Damper Installation Guidelines, which are included with shipment.
- Manually ensure that the damper sections operate freely and easily, before installing damper jumpers.
- If any assistance is required, call: Tamco CUSTOMER SERVICE 1-800-561-3449.
DAMPER JUMPER INSTALLATION PROCEDURE:
- Loosen and remove the hex nuts from the U-bolts located on the drive blades, where the two sections to be connected meet. (Take care that the U-bolts do not drop out if the damper is installed horizontally.)
- Install the damper jumper as shown on the drawings. Then, replace and tighten the hex nuts. (Insulated dampers must retain the rectangular spacer between the jumper and the blade.)
- Cycle the damper manually and ensure that both sections seal correctly. (Operate by driving the section which is to be directly connected to the motor.)
- If any adjustment is required, loosen both flanged nuts and offset the halves of the jumper slightly, so as to allow the section with the actuator to close fully last.
- Re-tighten the flanged nuts and verify damper closure.
- Repeat the adjustment procedure if necessary.
NOTE:
If a jumper is installed and two motors are to be utilized, the failure of one motor will prevent the remaining motor from operating both damper sections correctly, or may prevent operation entirely.
Tamco Aluminum Control Damper Installation Guidelines
Download PDF Document
Download PDF Document (French)
Damper Jumper Installation Guidelines
Download PDF Document
Download PDF Document (French)
Horizontal Jackshaft Installation Guideline
Download PDF Document
Download PDF Document (French)
