
Multi-Section Assemblies
Control Dampers
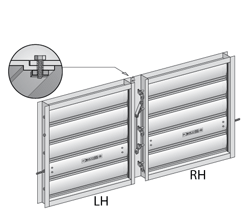
TWO SECTIONS WIDE
- Frame members are designed to overlap and are manufactured with two aligned positioning holes. When dampers are correctly positioned, holes will be aligned.
- Bolt alignment fasteners are shipped attached to the offset overlapping frame. (Alignment holes are not meant to be structural. Bracing may be deemed necessary by installer.)
- Ensure that both sections are straight, even, and aligned with each other.
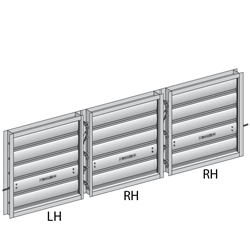
THREE SECTIONS WIDE
- Frame members are designed to overlap and are manufactured with two aligned positioning holes. When dampers are correctly positioned, holes will be aligned.
- Bolt alignment fasteners are shipped attached to the offset overlapping frame. (Alignment holes are not meant to be structural. Bracing may be deemed necessary by installer.)
- Ensure that all three sections are straight, even, and aligned with each other.
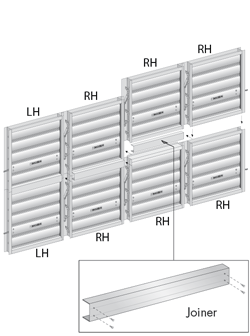
MULTIPLE SECTIONS WIDE BY MULTIPLE SECTIONS HIGH
- Install bottom tier damper section(s) first.
- Place second level of damper section(s) on top of bottom section(s), being careful that all sections are properly aligned.
- Install top damper section(s).
- Slide joiner(s) over frame member(s), where top and bottom section(s) meet(s).
- Using self-drilling screws, fasten joiner to damper frame member(s) through pre-punched holes in joiner. Caution: Joiner is not designed to be structural. Additional bracing may be required if deemed necessary by installer.
- Repeat procedure for all additional section tiers.
- Ensure all sections are straight, even, and aligned with each other.
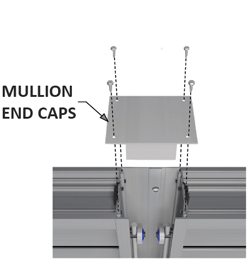
OPTIONAL MULLION END CAPS
FOR FLANGED TO DUCT TYPE MULTI-SECTION DAMPERS
- Mullion end caps are provided with all multi-section dampers that are to be installed as Flanged to Duct install type.
- These are required to prevent air flow from passing through open channels. (Mullion end caps are not intended for use as structural support.)
- Caulk surfaces between mullion end caps and damper frame for an airtight seal.
- Mullion end caps are not required for Installed in Duct type nor for Extended Rear Flange install type dampers. As such they are not provided as standard, but may be ordered as separate parts.
- Documents
Tamco Aluminum Control Damper Installation Guidelines
Download PDF Document
Download PDF Document (French)
Damper Jumper Installation Guidelines
Download PDF Document
Download PDF Document (French)
Horizontal Jackshaft Installation Guideline
Download PDF Document
Download PDF Document (French)